My Closet · Uncategorized

Poppy Apron and Raspberry Creek Towels

It’s been a while since I’ve posted anything new. But when I was asked to do a collaboration with Sofiona Designs’ Poppy Apron and Raspberry Creeks kitchen towels, I figured it was a good time to show off some pretty pictures of both.

First, Poppy Apron – there are two views to choose from, a one piece apron and a pieced one. Then there are options for a cell phone pocket (or two) on the pieced apron with trim or not, an optional towel loop, and of course your choice of straps (cross back or halter). Both styles are fully adjustable with D rings or sliders. If you’ve ever sewn a Sofiona pattern, you know that they pay attention to all the little details. This pattern is no exception and the professional touches, including the clean looking back side, make this an exceptional apron pattern! Sizing goes from child size XXS through adult size XL. Check it out while it’s on release sale through February 14, 2024.

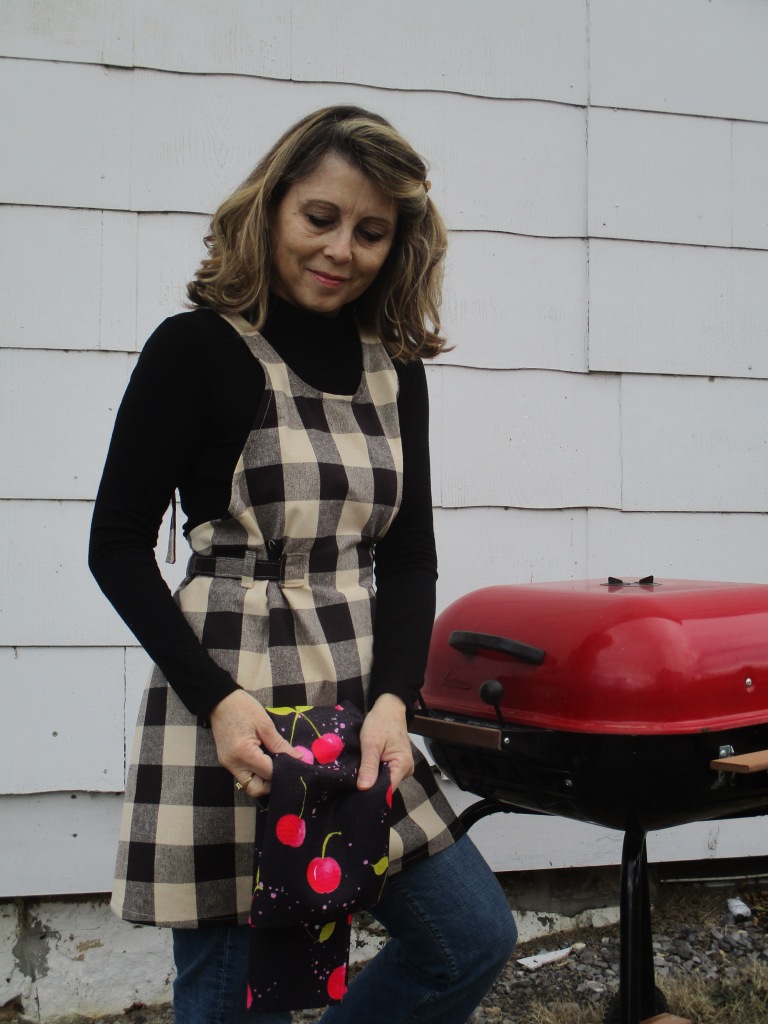
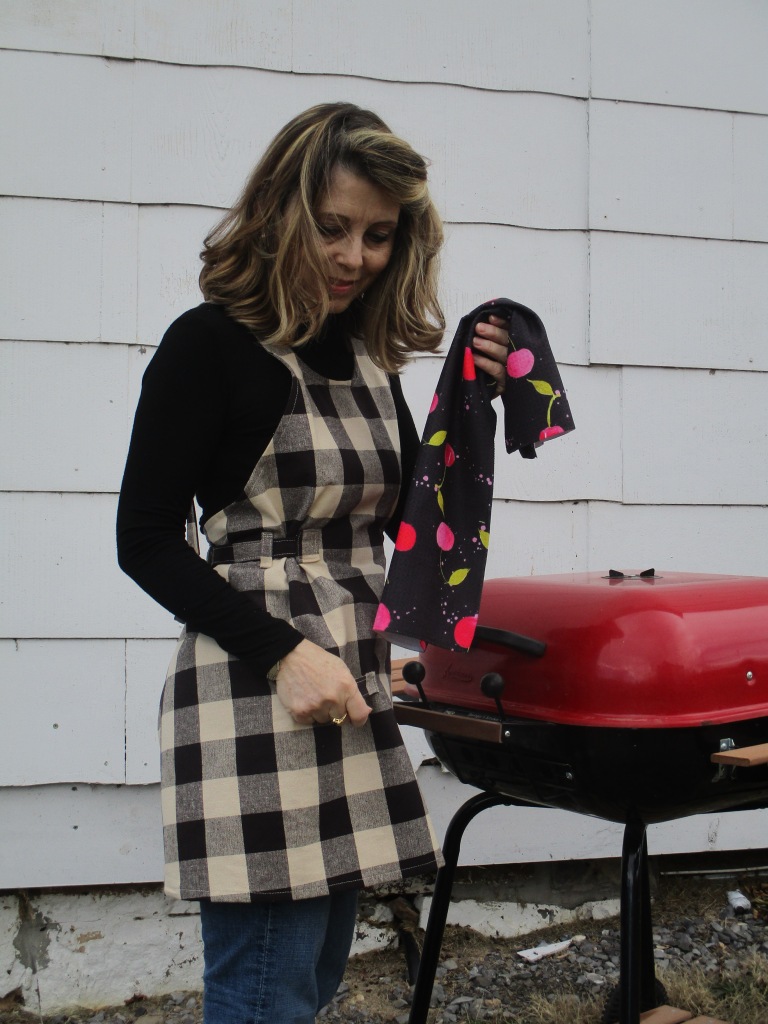
The first apron is the one piece with towel loop. The fabric is a lightweight canvas that I thought perfect for this project. See how the belt loops let the ties slide through to gather the waist at the sides? I love that little feature!

Raspberry Creek Fabrics has an extraordinary amount of towels to choose from. It wasn’t easy to narrow it down! My apron fabric was already chosen, so I was looking for coordinating towels so they wouldn’t clash. There are so many fun panel towels, but I picked all-over prints for hanging on the apron towel loop. And of course, the ones I chose were so different in color and style, that I had to sew a second apron to match. Here are the towel features from the website:

-16×25 inches
-100% Polyester Microfiber
-Fast Drying
-Highly Absorbent
-Machine Washable

The package arrived quickly and the quality of the towels are beyond my expectations. The colors are vibrant, the prints are beautiful, and they are soft and velvety to the touch. There are so so many prints and panels to choose from! Or you can choose the same towels I have here for the deer and forest and here for the cherries.

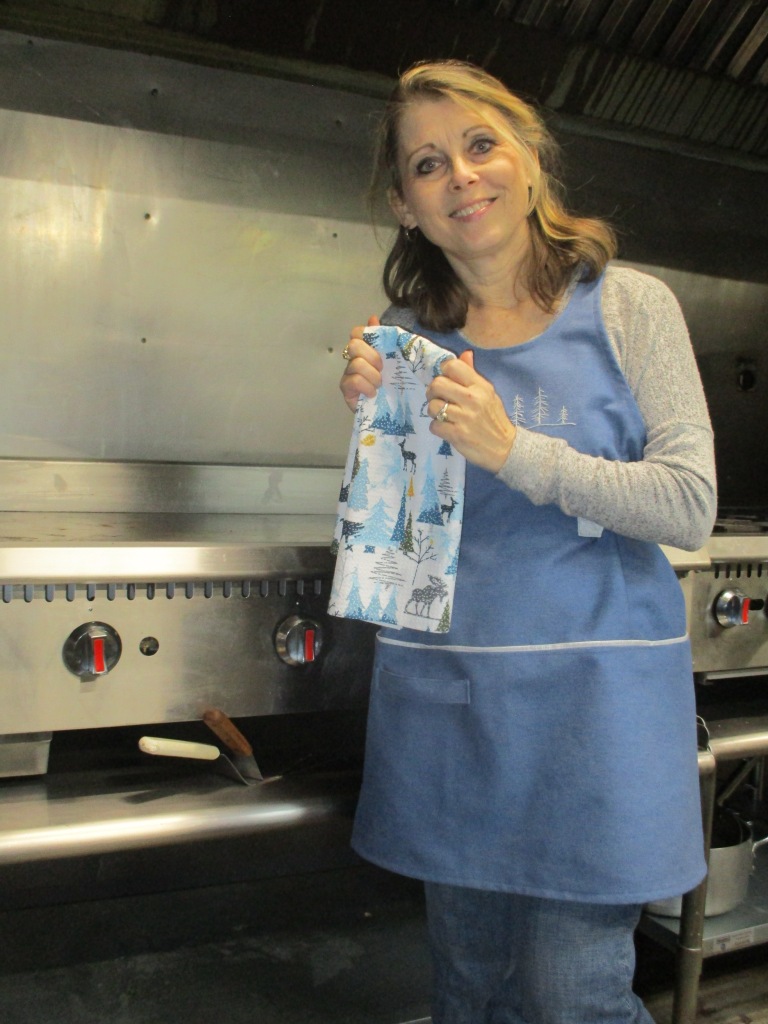
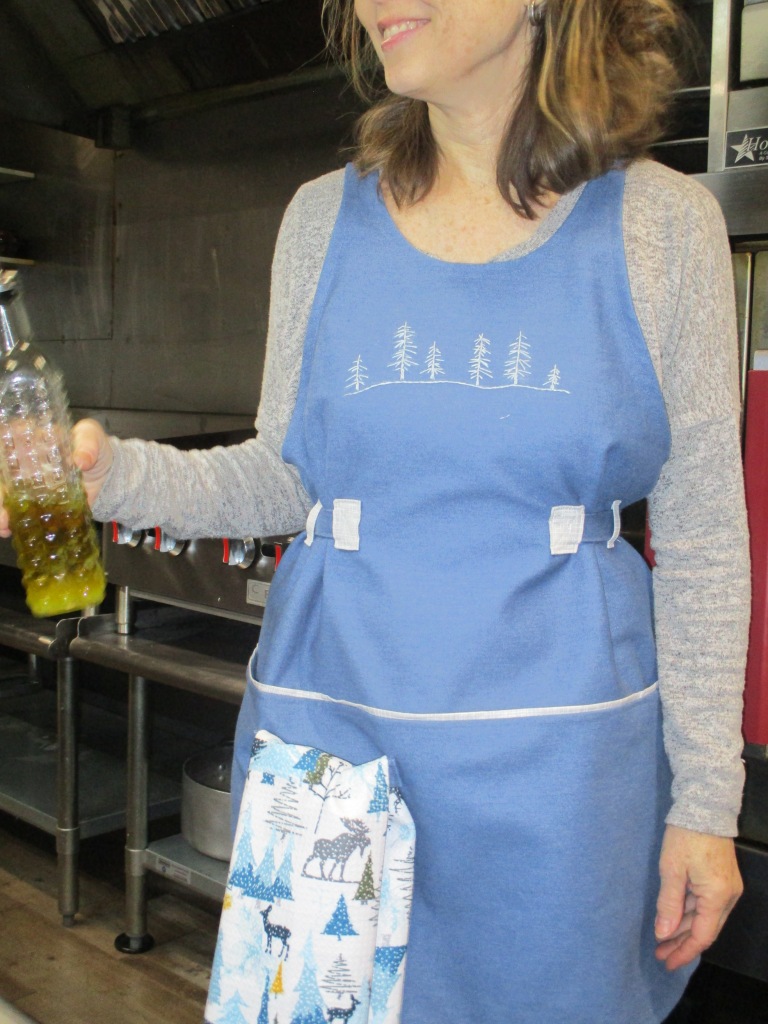
For my second apron, I made the pieced version with all the options. The way it’s put together is genius with all finished seams on the inside. I went with a winter theme on this one, going so far as to add hand embroidery to the front. The cute little stick trees are included in the Warm Winter Collection and I think they go quite nicely with the forest animals towel. Oh, and a great big thank you to Jamie at Crooked Gate Cafe for allowing me to borrow the kitchen for pictures of my second apron! They serve home grown amazing food and other locally made items. If you are ever near Leslie Arkansas, it’s definitely worth a stop to shop and enjoy a meal!

Get Poppy Apron for 25% off through February 14 and Raspberry Creek towels for 25% off through the end of February 2024!

The towels were gifted to me in exchange for showing and promoting them. All opinions are my own.

Thank you for visiting!

Quilts

In Random Formation for Project QUILTING

At the end of last year, I came across some posts on Facebook for Project Quilting. Not knowing what it was, I joined the group to discover there are quilting challenges with deadlines. I love a good challenge, so have been hanging around and participating when I have time. This is only the second challenge I’ve entered. Kim at Persimmon Dreams is the person behind the scenes of Project Quilting. You can find more info here, as I might not have all the info. We have a week to complete each challenge and link it up. This week is Challenge 14.6 – Conquer a Fear.

My fear is throwing away fabric and then needing it for a specific project later. That means I save way too many scraps that collect with not enough of them getting used. These tiny triangles are from a mini quilt I made called No Fear. I love the colors and couldn’t bring myself to throw them out. With some old burlap from stash, a piece of awful feeling fabric I meant to get rid of (used to back the burlap so batting wouldn’t show through), a piece of batting, my little triangles are finally gone from my room! And I have a fun new pillow cover.

These tiny triangles are from a mini quilt I made called No Fear, designed by Bee Sew Inspired. Here’s a picture of it.

I love the colors and couldn’t bring myself to throw them out. With some old burlap from stash, a piece of awful feeling fabric I meant to get rid of, a piece of batting, my little triangles are finally gone from my room! And I have a fun new pillow cover.

Burlap frays easily so it was necessary to serge the edges after cutting to size. My cover fits a 20” pillow form. The lines were drawn with a chalk wheel and after laying out the little triangles, I was wondering how they were going to stay in place until getting sewn down. I went with pins, but didn’t pin every one down so lots of them ended up falling off and had to be placed before sewing each row.

It turned out great (even if I say so myself)! Here’s the envelope back with my label.

Thanks for stopping by. See you next time!

My Closet

Winterthur Jacket!

Oh my goodness; you have to see Winterthur! The features are wonderful and look so professionally done! Utility Jackets have been all the rage this year, so you’ll be right on trend with this pattern. The pattern is labeled Difficult, but with the thorough step by step instructions by Itch-to-Stitch, even a less experienced seamstress with courage could sew Winterthur without problems!

Here are the details:

  • Options for cup sizes
  • Options for collar and three-piece hood
  • Fully lined
  • Front princess seams to shoulders
  • Back yoke
  • Cinched waist by drawstring on the inside
  • Front patch and optional chest pockets
  • Front zipper with buttoned flap
  • Two-piece long sleeve with adjustable buttoned sleeve hem
  • Designed for non-stretch woven fabric
  • Sizes 00-40
Worn with Uvita Top with Add On and Mountain View Jeans.

A variety of woven fabrics can be used for Winterthur. After searching my stash, I walked down to our local antique (and more) store. I found a few yards of this cotton duck for $3! The plaid lining did come from stash, having been there for many years. With such savings on making my jacket, I just had to enter it into the Bargainista Fashionista Contest on Pattern Review. Come on over and vote if you like my version of Winterthur! Here is the voting page with the sage green utility jacket as my first pic (per the rules). P.S. You must log in to Pattern Review to vote.

Get your own copy on sale through November 23, 2022 for 20% off here! Thank you for stopping by!

Uncategorized

Upland Trousers

The blog has been on the back burner lately as I haven’t felt like writing. These trousers by Itch-to-Stitch are so amazing though, that I had to show them off. Aren’t you ready to get back into some real pants? They come in sizes 00-40!

Here’s a summary of the Upland Trouser features:

  • High rise with waist facing (no waistband)
  • Fit through waist and hip and relaxed at thighs and below
  • Full length trouser legs with the hem hitting slightly above the ground
  • Front slanted pockets
  • Back double-welt pockets with loop and button closures
  • Designed for non-stretch woven fabric

I sewed a muslin and discovered the waist was a bit big and quite a bit of pooling fabric underneath my bum. One of the other testers had done a flat seat adjustment, and I decided to try the same. This is the tutorial I used. I picked some chambray from stash to try it out. Oh my, what a difference! All of a sudden, I had perfectly fitting trousers without any other adjustments! This is Melrose Top with the blue pair.

With such a great outcome, I had to sew another pair in linen. Unfortunately, I wasn’t paying attention and the waist “grew”, ending up way too big at my waist. I’ve figured out a fix though, and these two pair of Upland Trousers will be some of my favorite pants! The pinkish coral pair are paired with Chirripo Top.

Get your copy of Upland Trousers while they are on sale!

Thanks for stopping by! This posts contains affiliate links. If you choose to use them, there is no extra charge to you, but I receive a small compensation to help with my sewing costs. All opinions are my own. See you next time.

My Closet

12 Days of Christmas – Split Hem Tee hack

It’s the 12 Days of Christmas at Winter Wear Designs! Have you been following along? Join in the sales, freebies, and giveaways in the Winter Designs Fun Facebook group.

On the 4th day of Christmas, WWD gave to me…a free Split Hem Tee. This is a past freebie you may have missed with a new hack. There’s also a kids version for your mini me! I love the version I sewed last year and decided I needed a warm sweater version.

I was so anxious to start, that I didn’t do all the double checking I needed to for my hack. I pulled out my pattern and went straight to the cutting! Don’t be like me! Haha! I forgot to do some alterations for my thick sweater knit. The sleeves needed a little more room and the length needed an inch or two extra to wear with leggings, but my sweater is super warm with a huge snuggly cowl neck added on. It was easy because Suzanne did a cowl neck hack onto the Magnolia pattern and wrote a blog post about it. I just used her measurements for the cowl piece and instructions! Find her blog post here. Just remember if you have thick fabric and don’t want a big cowl, to shorten your piece.

Thank you for stopping by!

Kids and Babies

Winter Wear Designs 12 Days of Christmas – Kids PJs

Welcome to Winter Wear Designs’ 12 days of Christmas! Can you believe it’s already December? It’s been a long year and a quick one at the same time. Join us for the next 12 days to see all of the inspiration and gift ideas! Check out and support the sponsors too!

On the 1st day of Christmas, WWD gave to me – pj pants for our chickadees! Do you have your Christmas pjs sewn yet? Are you the one who has had them done since September, or are you still sewing up til the last minute? Lol I’m a little bit in between this year. So far, we have only one grandson to sew pjs for which is easily manageable. Lucky for me, this blog tour gave me the kick in the butt I needed to get them done!

The Kids PJ Pants by Winter Wear Designs are free (with a code from the FB group)! Sizes include 18 months – 14. When Abel and his parents visited recently, I got all his measurements. Oh My! Our 3 3/4 year old Able measures a size 6! He’s a tall boy like his daddy! I chose the stretch waistband without elastic and they were quick to sew. The fabric is Doodles from JoAnn’s. I know, I know, there are warnings everywhere from other seamstresses about this fabric. Until now, I’ve never had a problem with it. I washed this one twice, after it got all wavy and wonky, but it’s got to be the thickness of the paint (ink?) that is making it look this way, and there’s no changing it. They still look cute in my opinion, but I will be careful about choosing fabric with this much ink in the future. 🙂

Here is a picture of our sweet grandson. He lives too far away to get pics of him wearing them. He’ll be excited to get a package in the mail though.

The Perfect Panel Tee worked out perfect for a pj top with heat transfer vinyl (htv). Sizes include 1-14 with lots of options for both boys and girls! P.S. It’s on sale for only $3! Hurry though, the sale won’t last more than 24-48 hours! Going by the measurement chart, I printed and sewed size 5 for the shirt, choosing option D with long sleeves (with hacked cuffs measured at 85%). I used the moose design cut file from a previous year because it’s just so cute. You can see it here when I used it on a much smaller size for Abel!

Abel’s favorite color is red so I included it where I could. The grey printed fabric was already bought for his pjs before he told me about his favorite.

Be sure to check out the Winter Wear Designs Fun Facebook page during the 12 Days of Christmas for other activities and giveaways going on! Have fun sewing some pjs!

Thank you for stopping by!

My Closet

Pine Cove Pajamas

Itch-to-Stitch finally has some pjs! I’ve been waiting for these, and am excited about the different than usual design of the Pine Cove Pajama top! They can be made up in flannel like mine, or many other woven fabrics. You can even mix and match different fabric for top and bottom, or do some color blocking. I used a solid flannel for the collar because of not wanting to match more plaid. lol

Pine Cove Pajamas come in the new size range of 00-40! Here are some features of the pattern from the listing.

  • Designed for non-stretched woven fabric
  • Relaxed fit with dropped shoulders and long sleeves
  • Hip-length pajama top with side splits
  • One patch pocket on pajama top
  • Banded overlapped front with tie closures
  • Long pants with elastic waist
  • Layers feature—print only the sizes you need

As usual with Itch-to-Stitch patterns, I made size 2 for the top, shortening both bodice and sleeves, and size 6 bottoms, shortening the legs. They fit perfect with these adjustments.

It was difficult getting indoor pictures because the lighting is very bad. I’m very happy with my new Pine Cove PJs though, and will need to shorten the pant legs and sleeves to make a summer version. This pair is ready to pack for our Christmas trip to be with family.

Get your Pine Cove pattern while it’s on sale through December 7th!

This post contains affiliate links. Should you choose to use them, it will not cost you any extra; but gives me a chance to earn a little bit to put toward replacing spools of thread. 😉 Thank you for reading!

My Closet

SEW BEAUTIFUL Orosi Top

If you’ve been following along this week, you’ll notice some of the content in my posts are the same as the last. It’s because I want each one to stand alone for someone who stumbles upon one without the others. 

SEW BEAUTIFUL is the title of Kennis Wong’s book of sewing patterns! What?! Yes, her first book filled with 8 beautiful patterns with 18 variations to complete a whole wardrobe! This is sooooo exciting! Each design has been carefully designed without zippers or buttons, making it a great starting point for a new seamstress. Of course, an experienced seamstress like me loves to sew up quick and stylish garments too! And what a value, 8 patterns, 18 variations for only $24.99! The book is on pre-sale now, coming out on December 8, 2020. It will also be available on Kindle for $11.99. Sizes included are 00-20 (the book was written before the expanded size range).

All of the detailed instructions and quality you have come to love in Itch-to-Stitch designs are included in Kennis’ book. There are illustrations to show how to grade sizes, lengthen and shorten, and more. This is the last day we have to show off variations of the practical yet beautiful designs! You can sew a coordinating wardrobe taking you from home to work to date night and weekends with the patterns included in SEW BEAUTIFUL!

Orosi Top and Dress is the eighth, and last pattern in the book and this one is so unique. I love Kennis’ royal blue Orosi so much that I just had to make one the same – almost! Mine is more of a peacock blue, rather than royal. Isn’t this neckline wonderful? It’s not hard to sew either! A short sleeved V neck version of this top is half way sewn on my cutting table. Unfortunately it didn’t get finished in time. I plan to make a short sleeved dress version too.

Some of the ladies showcasing the patterns from SEW BEAUTIFUL have exclaimed over their favorite pattern, but I really have a hard time singling one out. I love so many of them!

This beautiful peacock blue fabric is brushed polyester. It drapes perfectly for this style!

Clearly, I need to choose a different bra with this top! Haha

Read about Palermo Top from Day 7 here, Fortuna Pants and Shorts from Day 5 here, Carlsbad Cardigan from Day 4 here, Mornington Top from Day 1 here. I haven’t sewn the patterns from Days 2, 3, or 6 yet.

Be sure to join the Itch-to-Stitch Facebook group to see more beautiful patterns, get help, and have fun with the rest of us!

Remember to pre-order your copy of SEW BEAUTIFUL so you don’t miss out. Sometimes the publisher runs out of copies!

This post contains affiliate links. If you choose to purchase from any of them, there is no extra charge to do so; but I get a tiny amount that helps me replace spools of thread from time to time. Thank you for reading!

My Closet

SEW BEAUTIFUL Palermo Top

If you’ve been following along this week, you’ll notice some of the content in my posts are the same as the last. It’s because I want each one to stand alone for someone who stumbles upon one without the others. 

SEW BEAUTIFUL is the title of Kennis Wong’s book of sewing patterns! What?! Yes, her first book filled with 8 beautiful patterns with 18 variations to complete a whole wardrobe! This is sooooo exciting! Each design has been carefully designed without zippers or buttons, making it a great starting point for a new seamstress. Of course, an experienced seamstress like me loves to sew up quick and stylish garments too! And what a value, 8 patterns, 18 variations for only $24.99! The book is on pre-sale now, coming out on December 8, 2020. It will also be available on Kindle for $11.99. Sizes included are 00-20 (the book was written before the expanded size range).

All of the detailed instructions and quality you have come to love in Itch-to-Stitch designs are included in Kennis’ book. There are illustrations to show how to grade sizes, lengthen and shorten, and more. Join us for the next eight days as we show off variations of the practical yet beautiful designs! You can sew a coordinating wardrobe taking you from home to work to date night and weekends with the patterns included in SEW BEAUTIFUL!

Palermo Top and Dress is the pattern for day 7. I tested this one last fall when most of my sewing room was packed up to move. Luckily, I found this beautiful border print at the thrift store which worked out great. This top is such a quick pattern to sew up! Now, the dress? I’m not sure. I also got fabric for it, but ran out of time to sew it, but I was really dreading all the gathering of tiers. I love it so much though, that I will sew it up soon!

I didn’t realize this dark plum color would be hard to photograph, but then I am barely beyond a basic photographer!

Read about Fortuna Pants and Shorts from Day 5 here, Carlsbad Cardigan from Day 4 here, Mornington Top from Day 1 here. I haven’t sewn the patterns from Days 2, 3, or 6 yet.

Be sure to join the Itch-to-Stitch Facebook group to see more beautiful patterns, get help, and have fun with the rest of us!

See the illustration of the gorgeous dress version at the bottom left.

Remember to pre-order your copy of SEW BEAUTIFUL so you don’t miss out. Sometimes the publisher runs out of copies!

This post contains affiliate links. If you choose to purchase from any of them, there is no extra charge to do so; but I get a tiny amount that helps me replace spools of thread from time to time. Thank you for reading!

My Closet

SEW BEAUTIFUL Fortuna Pants and Shorts

If you’ve been following along this week, you’ll notice some of the content in my posts are the same as the last. It’s because I want each one to stand alone for someone who stumbles upon one without the others.

SEW BEAUTIFUL is the title of Kennis Wong’s book of sewing patterns! What?! Yes, her first book filled with 8 beautiful patterns with 18 variations to complete a whole wardrobe! This is sooooo exciting! Each design has been carefully designed without zippers or buttons, making it a great starting point for a new seamstress. Of course, an experienced seamstress like me loves to sew up quick and stylish garments too! And what a value, 8 patterns, 18 variations for only $24.99! The book is on pre-sale now, coming out on December 8, 2020. It will also be available on Kindle for $11.99. Sizes included are 00-20 (the book was written before the expanded size range).

Today is day 5 of 8, showcasing Fortuna Pants and Shorts. It seems I always need a color of pants or shorts that I don’t have to match my overflowing closet full of tops, so of course I wanted to sew Fortuna! I started with the shorts to check the fit, and besides grading from a 0 waist to a 6 hip. In the directions, grading is not necessary with the elastic waistband, but with the huge difference from my waist to hips, it always works out better for me. I also lengthened the shorts by about 1 1/2″ for my personal preference. And that’s it!!! That’s almost unheard of for fitting bottoms for me!

The pocket trim is so unique and pretty! I used contrasting thread so it shows on the white.

This is Kosice Top with my shorts. The shorts are made with Ponte and cotton for the pocket trim.

I should have gotten a few pics without my hands in the pockets, haha!

Next up was Fortuna Pants. I was thinking cozy and found this fleece backed sweater knit in my stash. It is so thick that I decided to skip the pockets and to use cotton lycra for the waistband. Well, that sure made them super quick to sew! It all worked out well and I’ve been wearing them every two or three days!

Here they are with Orono Top

This Orono is glitter French Terry from SimplybyTi.com. I bought it in several colors and it’s awesome! (This green is not available any more)

It looks like another 1/2″ could come off the length.

It’s easy to sew a coordinating wardrobe taking you from home to work to date night and weekends with the patterns included in SEW BEAUTIFUL!

Read about Carlsbad Cardigan from Day 4 here and Mornington Top from Day 1 here. I haven’t sewn the patterns from Days 2 or 3 yet.

The line drawings below show some of the details I skipped and the other views that I didn’t sew.


Remember to pre-order your copy of SEW BEAUTIFUL so you don’t miss out. Sometimes the publisher runs out of copies!

This post contains affiliate links. If you choose to purchase from any of them, there is no extra charge to do so; but I get a tiny amount that helps me replace spools of thread from time to time. Thank you for reading!